
Turf War: Taipei maps · 角頭械鬥
Turf War: Taipei (角頭械鬥) has 13 maps today. Five are set in Taipei: Ximending, Taipei 101 · Xinyi, Taipei 101 · 88F, Memorial Hall and Sanchong. Five are original battlefields, and three rebuild classic maps from BeGone. This page goes through each one: the layout, where each side deploys, the bomb sites, the vehicles and what to expect, so you know where to run before the first round starts.
Play nowOverview
- Room sizes. 1v1 (Duel) and 6v6 (Squad) rooms play the eleven regular maps; 24v24 (War) plays only the two big maps, Meridian District and Taipei 101 · Xinyi.
- Modes. Every map plays Elimination. Sabotage needs bomb sites, so Warehouse is Elimination only. In Sabotage SWAT defends and Militia attacks; rounds last 90 seconds on two-site maps and 120 on one-site maps.
- Ammo crates. Every map has ammo crates, plus one more in each base.
- Choosing a map. Quick Play joins an open public room, or opens a 6v6 on a random map and mode. Starting your own room or playing Solo vs bots lets you pick the map (the list shows only maps that the room size and mode can host).
| Map | Rooms | Modes | Bomb sites | Vehicles | Size (m) |
|---|---|---|---|---|---|
| Ximending (西門町) | 1v1, 6v6 | Elimination, Sabotage | A Cinema Street, B Red House | Cars, scooters, helicopter | 162 × 132 |
| Taipei 101 · Xinyi (台北101・信義) | 24v24 | Elimination, Sabotage | A Mall Atrium, B West Plaza | Cars, scooters, helicopter | 272 × 292 |
| Taipei 101 · 88F (台北101・88F) | 1v1, 6v6 | Elimination, Sabotage | A Server Room, B Boardroom | None | 57 × 57 |
| Memorial Hall (中正紀念堂) | 1v1, 6v6 | Elimination, Sabotage | A Gallery Hall, B Memorial Chamber | None | 130 × 97 |
| Sanchong (三重) | 1v1, 6v6 | Elimination, Sabotage | A Temple Square, B Ironworks Yard | Scooters | 152 × 116 |
| Ochre Quarter | 1v1, 6v6 | Elimination, Sabotage | A, C | None | 120 × 116 |
| Citadel Keep | 1v1, 6v6 | Elimination, Sabotage | B Keep Courtyard (one site) | None | 140 × 140 |
| Railyard | 1v1, 6v6 | Elimination, Sabotage | B Turntable (one site) | None | 150 × 110 |
| Skyline Rooftops | 1v1, 6v6 | Elimination, Sabotage | B Central Tower (one site) | None | 140 × 140 |
| Meridian District | 24v24 | Elimination, Sabotage | A Park, B Construction Site | Cars, scooters, helicopters | 400 × 280 |
| Warehouse | 1v1, 6v6 | Elimination | None | None | 57 × 33 |
| Pipeline | 1v1, 6v6 | Elimination, Sabotage | A Ammo, B SWAT Base | None | 112 × 86 |
| Timbertown | 1v1, 6v6 | Elimination, Sabotage | A Cabin (one site) | None | 100 × 90 |
Size is the length and width of the play area. Press E to get in or out of a vehicle.
Taipei maps
All five Taipei maps are this project's own designs: composites drawn in the spirit of the real places and their landmarks, in the game's low-poly style. They are not surveys and are not taken from any other game. Shop signs use generic names (a noodle shop, a game hall, a hardware store) rather than real brands, and the city beyond each map is a procedurally generated skyline.
Ximending (西門町)
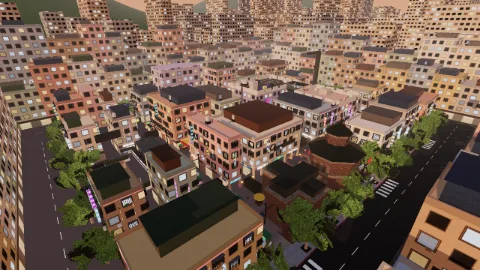
A pedestrian district under neon at night (listed as Taipei in the English map menu). Three east–west lanes (north, middle, south) cross three north–south streets (West St, Hanzhong St 漢中街 and East St), and a drivable ring road runs round the outside. SWAT deploys at the west end, in the plaza by the MRT exit (a glass station pavilion, a bus shelter, hedges); Militia at the east end, in a construction yard (hoarding, a site office on stacked containers, a crane). Each base opens three ways, the lane between the big screens and an alley north and south, and a pair of police or site barriers across its mouth hides it from the lanes.
Bomb site A is Cinema Street (電影街) on the north lane: the Starlight Cinema's front under its marquee balcony, with a stair at each end and the lobby behind (doors on the lane, on Hanzhong St and to the north sidewalk). B is the Red House (西門紅樓) square on the south lane: the octagonal brick hall with its lantern, the cross-shaped wing, café tables and trees on a brick square. Between them, the middle lane runs under the tarp roof of the night market (西門夜市); the game arcade (電玩城) has doors on all four sides, the helicopter's pad on its roof (a ladder up from Hanzhong St and one from East St) and a glazed skybridge over the middle lane to the hotel roof. The mall passage (西門商場) cuts through the north-west block, and arcades (騎樓) line the lanes under neon fascias, blade signs and string lanterns.
Six cars wait on the ring road, scooters sit at the bases' edges and in West and East Streets, and a helicopter stands on the arcade roof. The bases are about 140 m apart on foot, and SWAT reaches either site about two seconds (sprinting) before Militia, so a Militia rush straight at one site often meets defenders already in place. Street clutter (a van and a booth, a container, a poster hoarding, a bus shelter) juts from alternate sides of every long street, so apart from the ring road's drive lanes no sightline runs longer than 60 m and most fights happen at close to medium range.
Taipei 101 · Xinyi (台北101・信義)
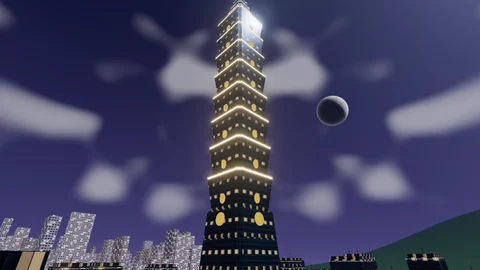
A big map for 24v24 rooms only. Department stores and towers line the north, Xinyi Rd (twenty metres of asphalt with a planted median) runs below them, the Taipei 101 block sits in the middle, then Heping Rd and an old military village (眷村) on the south. Keelung Rd closes the west and Songren Rd the east, with the foot of Elephant Mountain (象山) rising beyond. The tower itself is scenery (only its base is solid); the podium mall beside it is the centre of the fight. SWAT deploys in a forecourt on the north sidewalk behind a police cordon (two gates, staggered baffles inside), Militia in one on the south behind site hoarding.
Bomb site A is the Mall Atrium: a food court sunk to B1 under a ground-floor ring and an F2 gallery, a bridge across the void, stairs between all three floors, doors north, south and east, and a B1 passage out to the sunken garden. B is the West Plaza at the tower's foot, round a sculpture and an MRT exit pavilion. Three more landmarks: C, the Xinyi Skywalk, a glazed corridor eight metres up over Xinyi Rd (a stair down to the plaza, a ladder up from the sidewalk by SWAT's forecourt); D, the Sunken Garden (a pool, a pavilion, stairs at both ends); and E, the village, low brick houses with tin roofs and a middle row to fight through, with a ladder to its roof lookout.
Two cars park on Xinyi Rd by SWAT's forecourt and two on Heping Rd by Militia's, with one each on Songren Rd and Keelung Rd; scooters wait at both forecourts and on the West Plaza, and the helicopter on a pad at Xinyi Rd's east end. SWAT reaches each site about 1.5 to 2 seconds ahead of Militia. On a map this size a scooter moves you between sites far faster than running, but a rider is exposed and can be shot off it.
Taipei 101 · 88F (台北101・88F)
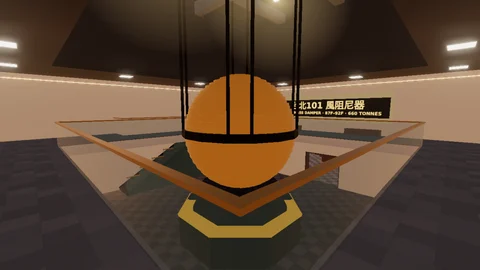
The fight moves indoors, onto an office floor near the top of Taipei 101, with the city at golden hour below the windows. The floor plate is the tower's notched square, 50 m across at the glass, laid out 3 × 3 round a stone core. SWAT steps out of the lifts in the Sky Lobby (reception and logo wall); Militia comes up by the fire stairs and freight lift on the floor under renovation to the south. Bomb site A is the Server Room (two zigzag rows of racks) and B the Boardroom, either side of the core. The Chairman's and CEO's suites take the north corners, the pantry and copy room sit south of the sites, and open offices with desk pods (and two glass meeting rooms in the south-east) run along the south glass.
There are three lanes: the west rooms, the east rooms, and the core's damper hall, where the tuned mass damper (41 stacked gold plates, 5.8 m across, on eight cables) hangs in a shaft through 89F. A stair either side of the hall climbs to the 89F viewing gallery round the shaft, which looks down into the hall (its glass balustrades are higher than a jump). The bases are only about 37 m apart on foot, no sightline exceeds 45 m, and SWAT reaches each site about 1.8 seconds ahead of Militia. Glass stops bullets. No vehicles.
Memorial Hall (中正紀念堂)
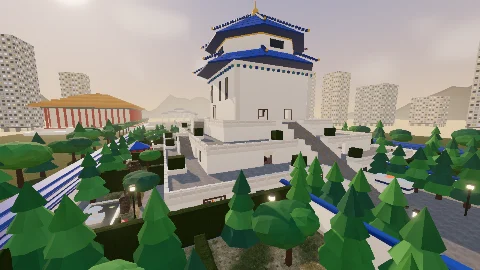
A compact arena in and around the National Chiang Kai-shek Memorial Hall. The white hall stands on a three-tier base under its blue glazed octagonal roof, with a marble-balustraded terrace on each tier (4.5, 9 and 13.5 m). The 89-step grand staircase climbs the west face in three flights (30, 30 and 29 steps) with a landing at each terrace; a straight rear staircase climbs the east face and side stairs hug the north and south. The memorial chamber holds the seated bronze statue, decorative inscription panels, the coffered ceiling, the tall bronze doors swung open and honour-guard posts (no figures). The base holds the museum: the entrance hall under the grand staircase, exhibition rooms, a lecture hall, a library, the gift shop, the east lobby and the double-height Gallery Hall, with switchback stairwells up into the chamber.
Bomb site A is the Gallery Hall and B the Memorial Chamber before the statue; landmarks C to E are the grand staircase's upper landing, the north garden and the gift shop. SWAT deploys on the east forecourt, Militia on the slice of Liberty Square in front of the grand staircase; screen walls with one gateway each close the bases off from the gardens of clipped hedges, pines, a pavilion and a lotus pond. Because B is directly above A, a site is armed and disarmed only on its own floor: pressing E on the storey above or below does nothing, so go to the right floor. Apart from the grand staircase's axis no sightline runs longer than 55 m, and SWAT reaches both sites about 1.8 seconds ahead of Militia. The National Theater, the National Concert Hall and the Liberty Square gate stand to the west as backdrop. No vehicles.
Sanchong (三重)
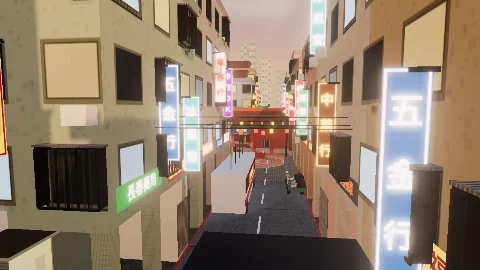
Close-quarters city fighting in the old blocks of Sanchong, New Taipei, across the Tamsui River from Taipei. Four- and five-storey walk-ups (公寓) wear iron window cages (鐵窗) and AC units, with tin rooftop add-ons (頂樓加蓋) and water tanks above and rolling-shutter shopfronts below; vertical shop signs, overhead wires and rows of parked scooters are everywhere. Three lanes run east–west between the bases:
- North: the main street, under its arcades (騎樓), with a delivery van, a betel-nut kiosk (檳榔攤) and a pilgrims' tour bus (進香團) parked across it. It ends at the temple square (廟口): the temple with its stone lions and swallowtail ridge, the incense burner, the gold furnace, offering tables, lantern strings and the climbable opera stage (戲台) facing it. You can walk through the temple from the square to the east main street.
- Above it: the Taipei Bridge approach (台北橋引道), a deck 6.5 m up reached by the scooter ramp (機車引道, the 機車瀑布 or "scooter waterfall") from the north-west corner and a stair from the east. It is high ground over the square but exposed. Below runs the under-bridge lane with its piers, a kiosk and a scooter repair cage.
- Middle: the covered market (三重市場), two aisles round a centre row of island stalls, one door at each end (west into the north aisle, east into the south aisle) and a stall across each aisle, so a run through the hall weaves from aisle to aisle.
- South: the back alleys (巷弄), three-to-four-metre lanes that zigzag between old houses, with a pocket square round the earth-god shrine (福德祠), its paper furnace and a banyan, and a roof terrace up a ladder.
Bomb site A is the temple square; B is the ironworks yard behind the market: steel plate stacks, a container, oil drums, a gas-bottle cage and a forklift under a gantry crane, entered from the market (north gate), the alley (south gate), the print shop's passage (east) and through the workshop (west), whose roof is up a ladder. SWAT deploys on the levee road (環河北路) at the foot of the river's flood wall on the east; Militia in the night-market car park on the west, by a temple-fair neon truck (電子花車). Two drivable scooters wait at each base. The bases are about 155 m apart on foot and SWAT reaches both sites about 2.3 seconds ahead of Militia; no sightline exceeds 60 m, and every standing spot has chest-high cover within 8 m, so short-range weapons shine here.
Original battlefields
Five maps of the game's own, set away from Taipei.
Ochre Quarter
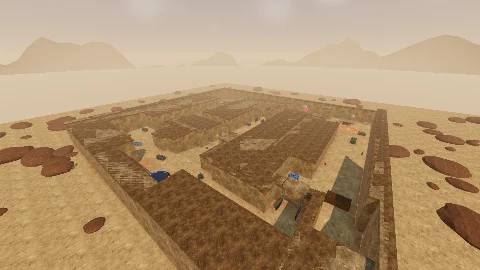
A desert old town, an original homage to the classic two-site layout of CS:GO's Dust II, built from our own geometry and assets with nothing imported from that game. It is deliberately asymmetric: Long, Mid, Catwalk and Tunnels. The two bomb sites are labelled A and C: A in the north-east at the top of Long, C in the north-west at the end of Tunnels; B is Mid, a landmark rather than a site. In Sabotage, Militia attacks from the southern plaza and SWAT holds the northern courtyard.
Citadel Keep
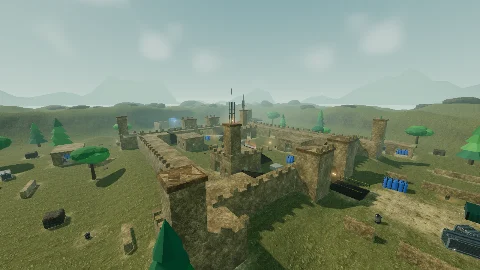
A stone fortress on a grassy hill. Curtain walls with rampart walks enclose the inner courtyard and its twin keeps, and roofed galleries run under the north and south ramparts. The barbicans in front of the west and east gatehouses (landmarks A and C) sit behind dry ditches with bridges. The bases are camps at the far edges of an open outer bailey of orchards, field walls and a watch post. The only bomb site is the Keep Courtyard (labelled B), so Sabotage rounds last 120 seconds.
Railyard
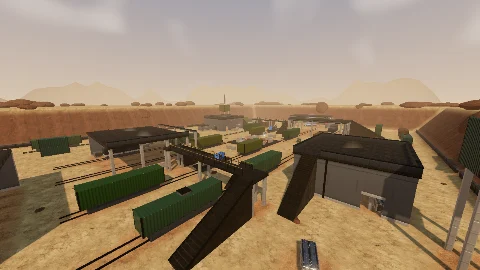
A compact, symmetrical freight yard. Four tracks run from one base to the other, lined with boxcars, tankers and flatcars whose gaps make the cross lanes. The engine sheds at each end are landmarks A and C; the open turntable in the middle is the only bomb site (labelled B; 120-second Sabotage rounds). Twin two-storey depots with mezzanines and roof decks, footbridges over the tracks, a signal gantry, container stacks and water towers frame the yard.
Skyline Rooftops
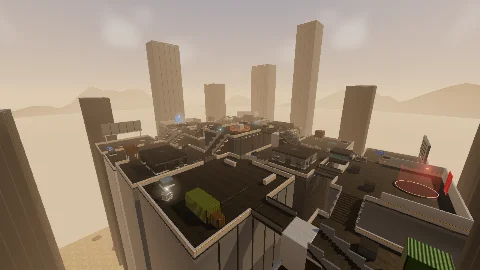
A fight across the roofs of a frozen city, a hundred metres above the streets. Roofs are joined by steel bridges, stair flights over the gaps and an enclosed sky-bridge corridor, and there is no street to fall back to: a slip over the parapet is fatal. SWAT deploys on the west roof, Militia on the east. The two helipad roofs (landmarks A and C) are wide open, with a crashed gunship for cover; the only bomb site is the Central Tower roof (labelled B, at 36 m the highest point), with 120-second Sabotage rounds.
Meridian District
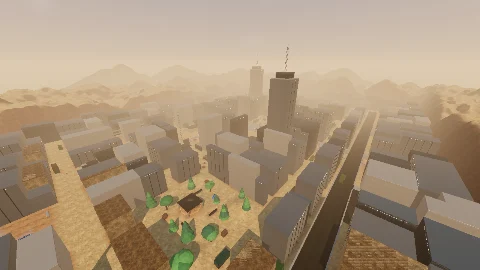
A big map for 24v24 rooms only: a war-torn desert city quarter with a base at each end, west and east. From west to east run A, the Park (wooded hills round a pavilion), B, the Construction Site (a pit under an open steel frame and a tower crane), C, Meridian Square (decked over a drained canal), then D and E, B and A mirrored onto the far bank. The dry canal splits the city north to south; the square's deck and two road bridges cross it, and stairs lead down to the canal bed, which runs under all of them. Elevated highways along the north and south edges give long sightlines, and a ruined block breaks the centre street between A and B. The bomb sites are A and B, both on SWAT's side, so Militia has to cross the canal to attack. Each base boulevard has two cars, two scooters and a helicopter.
Homages to BeGone
These three maps rebuild maps from BeGone, nPlay's browser shooter, from the originals' top-down layouts and wiki descriptions. The geometry and the CC0 textures (brick, planks, corrugated iron, mossy plaster, cobblestone) are this project's own; no BeGone assets are used.
Warehouse
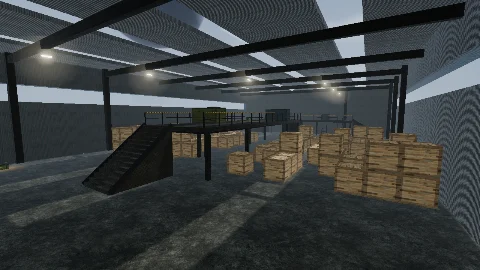
One skylit crate hall with snow outside, and the smallest map. Militia deploys in the west bay and SWAT in the east, each under its own sniping deck; the middle is a maze of wooden crates, and a bridge crosses over it carrying the hall's one ammo crate (each base has its own as well). The bridge is two offset lanes, each climbed by stairs from one team's side, with a team-coloured box half-blocking each lane. Each deck has stairs at both ends and four ladders up its face. The two halves are mirror images, as in the original. With no bomb sites, Warehouse is Elimination only.
Pipeline
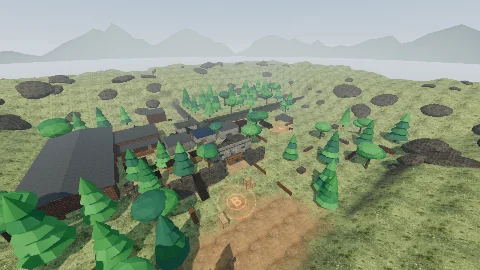
BeGone's largest map. A raised pipeline on a retaining wall runs across the north half, splitting the forest behind it from the open ground in front, and a hole in the wall drops attackers down behind the pipe's piers. Militia deploys in the yard top-left by the big Militia building, whose roof forms an L with its annex; SWAT in the little valley bottom-left, under a ridge with yellow huts, yellow stairs and a house built over the tunnel that cuts through it. In the middle stand three connected buildings with a shared roof; east of them is the Ammo area by the pipe stack, then the ditch and the open field. Bomb site A is at Ammo and B is in SWAT's own valley. Sightlines are long, so a scope earns its price here.
Timbertown
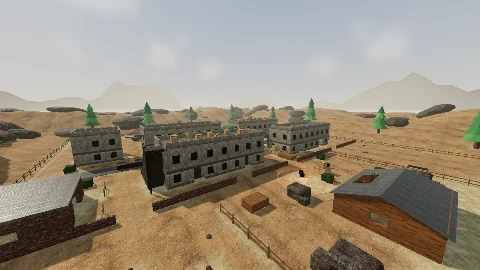
A dilapidated, moss-streaked estate: large, but it plays like a medium map. Militia deploys in the fenced west yard behind the Hills (a dirt mound with boulders and a log stack); SWAT in the fenced east yard round the Cabin, a broken wooden house with a hole in its roof. Between them stand two columns of two-storey plaster blocks split by a road, with the central Platform (a concrete scaffold) over the crossroads. Two roofs are walkable by switchback stairs: the Militia Roof (north-west block) and the SWAT Roof (south-east block). The single bomb site is in SWAT's yard west of the Cabin (labelled A; 120-second Sabotage rounds), and ammo crates stand in the Cabin and under the Platform.
Credits
Made by Ian Hsiao. The layouts of the Taipei maps and the original battlefields are this project's own; for rules, weapons and modes see About. Source code: github.com/madeyexz/turfwar (MIT).